Home>Create & Decorate>DIY & Crafts>Transform Your Bedroom With A DIY Pallet Headboard: A Home Improvement Project
DIY & Crafts
Transform Your Bedroom With A DIY Pallet Headboard: A Home Improvement Project
Published: February 9, 2024

Senior Editor in Create & Decorate, Kathryn combines traditional craftsmanship with contemporary trends. Her background in textile design and commitment to sustainable crafts inspire both content and community.
Transform your bedroom with a stunning DIY pallet headboard! Get inspired to tackle this home improvement project and add a touch of creativity to your space with our DIY & Crafts guide.
(Many of the links in this article redirect to a specific reviewed product. Your purchase of these products through affiliate links helps to generate commission for Twigandthistle.com, at no extra cost. Learn more)
Introduction
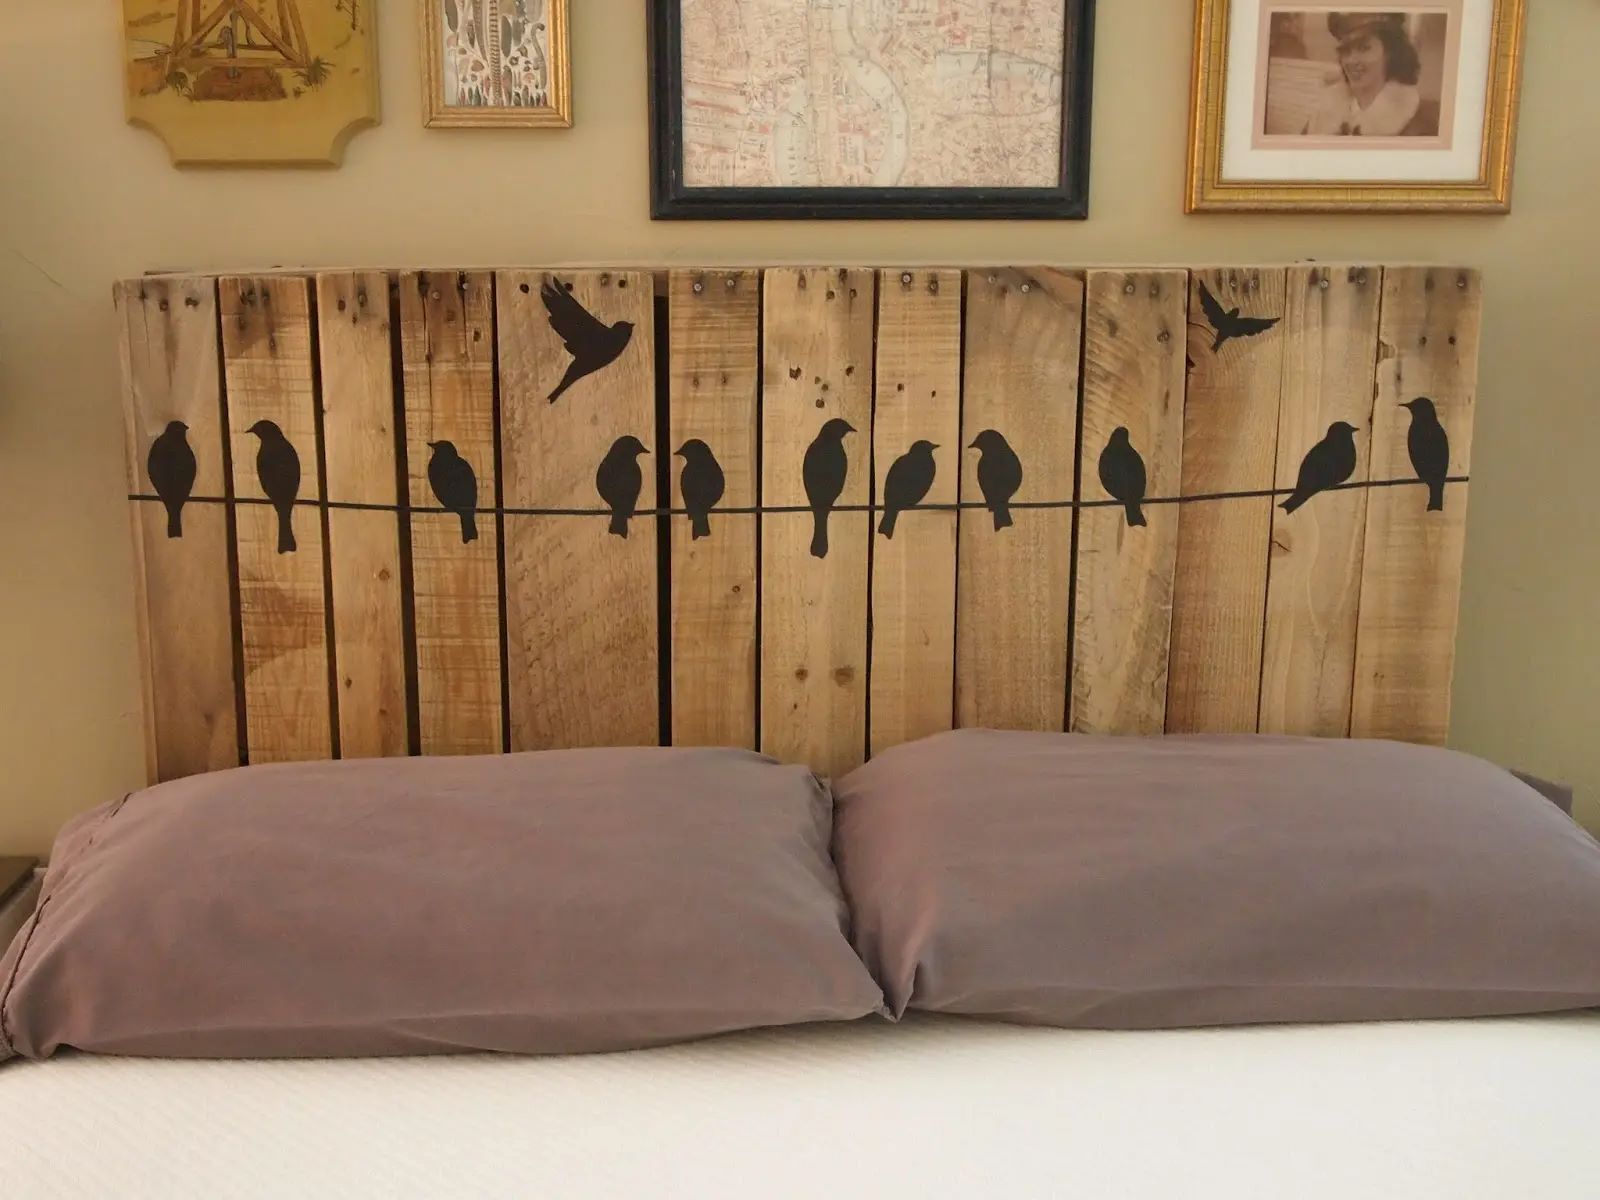
Are you looking to add a touch of rustic charm and personality to your bedroom? A DIY pallet headboard might just be the perfect project to transform your sleeping space into a cozy haven. This creative and budget-friendly endeavor allows you to unleash your inner craftsman while elevating the aesthetic appeal of your bedroom.
Crafting your own pallet headboard not only brings a unique and personalized element to your decor but also provides an opportunity to repurpose materials, contributing to a sustainable and eco-friendly approach to home improvement. By embarking on this DIY journey, you can infuse your bedroom with a sense of warmth and character that store-bought furniture often lacks.
In this comprehensive guide, we will walk you through the step-by-step process of creating a stunning pallet headboard, from sourcing the materials to assembling and mounting the finished product. Whether you're a seasoned DIY enthusiast or a novice looking to explore the world of woodworking, this project offers a rewarding and achievable endeavor that will leave you with a sense of pride and accomplishment.
So, roll up your sleeves, gather your tools, and prepare to embark on a fulfilling adventure that will not only enhance the ambiance of your bedroom but also unleash your creativity. Let's dive into the materials needed to kickstart this exciting home improvement project.
Materials Needed
Before diving into the construction process, it's essential to gather all the necessary materials and tools to ensure a smooth and efficient DIY experience. Here's a comprehensive list of items you'll need to embark on this exciting pallet headboard project:
Materials:
-
Pallets: Look for sturdy, undamaged pallets that will serve as the foundation for your headboard. You can often find pallets at local businesses, warehouses, or online marketplaces. Ensure that the pallets are clean and free from mold or pests.
-
Sandpaper: Invest in coarse and fine-grit sandpaper to smooth out rough surfaces and edges on the pallets. This will prepare the wood for staining and ensure a polished final appearance.
-
Wood Stain or Paint: Choose a wood stain or paint in a shade that complements your bedroom decor. Whether you prefer a rich, dark stain for a rustic look or a vibrant paint color to add a pop of personality, selecting the right finish is crucial for achieving the desired aesthetic.
-
Paintbrushes or Stain Applicators: Depending on your chosen finish, gather the appropriate brushes or applicators to evenly coat the pallets with the stain or paint.
-
Screws and Nails: To securely assemble the pallets and mount the headboard, stock up on screws and nails of various sizes. Ensure that the fasteners are suitable for woodworking projects and compatible with the thickness of the pallet wood.
-
Measuring Tape and Level: Accurate measurements and precise alignment are key to a professional-looking end result. A measuring tape and level will aid in ensuring that the headboard is symmetrical and properly positioned when mounted.
-
Drill and Screwdriver: Equip yourself with a reliable drill and screwdriver to attach the pallets together and affix the headboard to the wall. A cordless drill offers convenience and maneuverability during the assembly process.
-
Safety Gear: Prioritize safety by wearing protective gear such as gloves and safety goggles when handling tools and working with wood. This precautionary measure minimizes the risk of splinters, cuts, or eye injuries.
-
Optional Accessories: Depending on your design preferences, consider additional embellishments such as decorative knobs, hooks, or LED string lights to customize the headboard and infuse it with your personal style.
By ensuring that you have all these materials at your disposal, you'll be well-prepared to commence the project with confidence and enthusiasm. With the materials in hand, the next steps will involve preparing the pallets and embarking on the transformative journey of crafting your very own pallet headboard.
Step 1: Preparing the Pallets
Before diving into the construction process, it's crucial to prepare the pallets for the transformation into a stunning headboard. This step sets the foundation for a polished and professional end result. Here's a detailed breakdown of the preparatory measures:
-
Inspect and Clean the Pallets: Begin by carefully inspecting each pallet to ensure that they are structurally sound and free from damage. Look for any protruding nails or splintered wood that may pose safety hazards or detract from the headboard's visual appeal. Once inspected, use a stiff brush or compressed air to remove any dirt, debris, or loose particles from the surface of the pallets.
-
Dismantle if Necessary: Depending on the design and size of your desired headboard, you may need to dismantle the pallets to extract individual planks. Using a pry bar and hammer, gently disassemble the pallets, taking care to preserve the integrity of the wood. This step allows for greater flexibility in arranging the planks to achieve the desired aesthetic for your headboard.
-
Trim and Resize: In some cases, the pallet planks may require trimming or resizing to ensure uniformity and a cohesive appearance. Using a saw, carefully trim any excess length or uneven edges to create uniform planks that will seamlessly fit together during the assembly process.
-
Dealing with Imperfections: Sand down any rough or uneven surfaces on the pallet planks using coarse-grit sandpaper. This step not only enhances the tactile appeal of the headboard but also ensures a smooth and even application of the wood stain or paint in the subsequent steps.
By meticulously preparing the pallets, you are laying the groundwork for a visually striking and structurally sound headboard. This attention to detail sets the stage for a seamless transition to the next phase of the project: sanding and staining the pallets to achieve the desired finish. With the pallets primed and ready, you are one step closer to bringing your vision of a captivating DIY pallet headboard to life.
Step 2: Sanding and Staining
With the pallets meticulously prepared, the next crucial step in crafting a stunning DIY pallet headboard is the process of sanding and staining. This transformative phase not only enhances the visual appeal of the wood but also protects it from wear and tear while imparting a personalized touch to the finished headboard.
Sanding the Pallets
Begin by using fine-grit sandpaper to smooth the surfaces of the pallet planks, focusing on eliminating any remaining roughness or imperfections. This step is essential for achieving a polished and professional appearance, as it prepares the wood to absorb the stain evenly. Take care to sand along the grain of the wood, applying consistent pressure to ensure a uniform texture across all the planks.
Choosing the Right Stain or Paint
When selecting a wood stain or paint for your pallet headboard, consider the overall aesthetic of your bedroom and the mood you wish to evoke. Opt for a rich, dark stain to accentuate the natural grain of the wood and imbue the headboard with a rustic allure. Alternatively, a vibrant paint color can inject a playful and contemporary vibe into the bedroom decor. Whichever option you choose, ensure that the finish complements the existing color scheme and style of your bedroom.
Applying the Stain or Paint
Using a paintbrush or stain applicator, generously coat the sanded pallet planks with the chosen finish, working in the direction of the wood grain for a seamless application. Take your time to ensure that the stain or paint penetrates the wood, allowing its unique characteristics to shine through. If you prefer a more distressed or weathered look, consider applying the stain unevenly or lightly sanding certain areas after the initial application to create a sense of age and character.
Drying and Curing
After applying the stain or paint, allow the pallet planks to dry thoroughly according to the manufacturer's instructions. This crucial step ensures that the finish adheres properly and achieves its intended color and sheen. Once dry, consider applying a clear sealant to protect the wood and enhance the longevity of the headboard, especially if it will be subjected to daily wear and tear.
By meticulously sanding and staining the pallets, you are infusing the headboard with a touch of your personal style while preserving the natural beauty of the wood. This transformative process sets the stage for the final assembly and mounting of the headboard, bringing you one step closer to realizing your vision of a captivating and bespoke bedroom centerpiece.
Step 3: Assembling the Headboard
With the pallets meticulously prepared and adorned with the chosen finish, the exhilarating phase of assembling the headboard commences. This pivotal step brings together the individual elements to form a cohesive and visually captivating centerpiece for your bedroom. Here's a detailed breakdown of the assembly process:
Arranging the Pallet Planks
Begin by arranging the pallet planks in the desired configuration to form the headboard. Whether you opt for a symmetrical layout with evenly spaced planks or a more eclectic arrangement with varying lengths and textures, take the time to experiment with different compositions to find the most visually appealing design. This creative process allows you to tailor the headboard to your personal aesthetic preferences, ensuring that it harmonizes seamlessly with the existing decor of your bedroom.
Securing the Planks
Once you've settled on the ideal arrangement, use screws and a reliable drill to secure the pallet planks together. Position the planks snugly against each other, ensuring a seamless alignment to create a polished and professional appearance. Take care to drive the screws into the wood at consistent intervals, maintaining the structural integrity of the headboard while reinforcing its visual allure. This meticulous approach guarantees a sturdy and enduring construction that will withstand the test of time.
Adding Optional Embellishments
To infuse the headboard with an extra layer of charm and personality, consider incorporating optional embellishments such as decorative knobs, hooks, or LED string lights. These thoughtful additions can elevate the visual impact of the headboard, adding a touch of whimsy or functionality to the overall design. Whether you choose to adorn the headboard with a string of twinkling lights for a cozy ambiance or attach decorative knobs for a hint of vintage elegance, these embellishments serve as the finishing touches that transform the headboard into a captivating focal point within the bedroom.
Final Inspection
Upon completing the assembly, conduct a thorough inspection of the headboard to ensure that all components are securely fastened and aligned to perfection. Take this opportunity to make any necessary adjustments and tighten any loose screws, reaffirming the structural integrity of the headboard. This meticulous attention to detail guarantees a flawless end result that exudes craftsmanship and artistry.
By meticulously assembling the pallet planks and incorporating optional embellishments, you are on the cusp of unveiling a bespoke and visually striking headboard that reflects your unique style and creativity. With the headboard taking shape, the final step of mounting it in your bedroom awaits, bringing the culmination of this transformative DIY project to fruition.
Step 4: Mounting the Headboard
Mounting the DIY pallet headboard is the culminating step that brings your vision to life, transforming your bedroom into a captivating sanctuary of comfort and style. This pivotal phase involves securely affixing the headboard to the wall, ensuring a seamless integration with the existing decor while adding a touch of rustic elegance to the space.
Preparing the Wall
Before mounting the headboard, it's essential to prepare the wall to accommodate the installation. Begin by identifying the optimal placement for the headboard, taking into account factors such as the height of the bed, the desired visual impact, and any existing fixtures or wall-mounted accessories. Use a measuring tape and level to mark the precise positions where the headboard will be mounted, ensuring symmetrical alignment and a visually balanced composition.
Securing the Headboard
With the mounting locations identified, enlist the assistance of a reliable drill and appropriate screws to secure the headboard to the wall. Depending on the weight and dimensions of the headboard, select screws that are suitable for anchoring it securely to the wall, taking care to penetrate into the wall studs for maximum stability. Enlist the help of a friend or family member to hold the headboard in place as you affix it to the wall, ensuring a smooth and controlled installation process.
Final Adjustments
Once the headboard is securely mounted, take a step back to admire the transformative impact it has on the bedroom's ambiance. Conduct a final inspection to ensure that the headboard is level, securely fastened, and harmoniously integrated with the surrounding decor. Make any necessary adjustments to the positioning or tightness of the screws, guaranteeing a flawless and professional installation that exudes craftsmanship and attention to detail.
Reveling in the Transformation
As the headboard takes its rightful place as the focal point of the bedroom, take a moment to revel in the remarkable transformation that has unfolded. The DIY pallet headboard, crafted with passion and creativity, now stands as a testament to your ingenuity and dedication to infusing your living space with character and charm. With its rustic allure and personalized touch, the headboard serves as a captivating backdrop for rest and relaxation, elevating the entire room with its inherent warmth and visual appeal.
By meticulously mounting the headboard, you have completed a gratifying journey of DIY craftsmanship, culminating in a stunning and bespoke addition to your bedroom. As you bask in the ambiance of your revitalized sleeping space, the headboard stands as a tangible symbol of your ability to transform raw materials into a functional work of art, enriching your home with a touch of rustic allure and individuality.
Conclusion
In conclusion, the journey of crafting a DIY pallet headboard transcends the realm of home improvement, evolving into a transformative and deeply rewarding experience. From the initial stages of sourcing pallets to the final moments of mounting the headboard, this project encapsulates the essence of creativity, craftsmanship, and personal expression.
As the dust settles and the headboard takes its rightful place in the bedroom, a profound sense of accomplishment permeates the air. The rustic allure of the repurposed pallets, meticulously sanded and stained to perfection, now stands as a testament to the power of ingenuity and resourcefulness. Each screw driven into the wood and every brushstroke of stain applied represents a labor of love, infusing the headboard with a touch of the creator's spirit.
Beyond its aesthetic appeal, the DIY pallet headboard embodies sustainability and eco-consciousness, breathing new life into discarded materials and championing the ethos of repurposing and upcycling. By embracing this approach, the project not only adds a unique and personalized element to the bedroom but also contributes to a more sustainable and environmentally conscious lifestyle.
Moreover, the process of crafting the headboard fosters a profound connection to the living space, infusing it with warmth, character, and a sense of individuality. The headboard becomes more than a mere piece of furniture; it becomes a tangible reflection of the creator's vision and creativity, enriching the bedroom with a narrative of craftsmanship and artistry.
As the final screws are tightened and the headboard is mounted, a sense of pride and fulfillment washes over the creator, affirming the transformative power of hands-on creativity and the ability to shape one's living environment. The DIY pallet headboard stands as a testament to the potential for beauty and functionality inherent in raw materials, serving as a daily reminder of the creator's ability to bring forth something remarkable from humble origins.
In essence, the journey of crafting a DIY pallet headboard transcends the act of home improvement, evolving into a deeply personal and enriching endeavor that leaves an indelible mark on the living space and the creator's sense of accomplishment. It stands as a testament to the power of creativity, resourcefulness, and sustainability, weaving a narrative of ingenuity and individuality into the fabric of the home.